
Have you ever wondered how experts create amazing edits in Photoshop? The secret is layers! Layers are one of the most powerful tools in Photoshop. Learning how to use them will improve your editing skills.
In this lesson, we will explain:
- What layers are
- The different types of layers
- How to create and use layers
If you want to follow along, you can download our example file. This file will be available online and as an email attachment.
What Are Layers?
Think of layers as transparent sheets stacked on top of each other. Each layer can contain different elements of your image. Layers allow you to edit different parts of an image separately.
There are two main types of layers:
- Content layers – These include images, text, and shapes.
- Adjustment layers – These apply effects like brightness or color changes. These effects do not change the original image.
You can turn layers on and off to see how they affect the image. Click the eye icon next to a layer to hide or show it.
Why Use Layers?
Layers give you more control over your edits. Instead of changing the entire image, you can edit one layer at a time. This makes it easy to experiment without damaging the original image. Once you start using layers, you’ll find them essential for almost every project.
Working with Layers
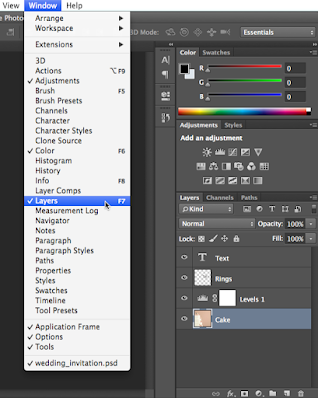
You can view and manage layers in the Layers panel. It is usually in the lower-right corner of the screen. If you don’t see it, go to Window > Layers to enable it.
Creating an Adjustment Layer
Adjustment layers do not contain images. Instead, they apply changes to the layers below. Follow these steps to create one:
-
Select the layer where you want the adjustment to appear.
- Click the Adjustment button at the bottom of the Layers panel.
- Choose an adjustment, such as Hue/Saturation.
- Use the Properties panel to adjust the effect.


Try this: Select the "Cake" layer in the example file. Create a Hue/Saturation adjustment layer. Move the sliders in the Properties panel to see the effect.

Creating a Blank Layer
A blank layer allows you to add new content, like drawings or brush strokes. To create a blank layer:
-
Click the New Layer button in the Layers panel.
- A new layer will appear in the list.

Duplicating a Layer
Duplicating a layer is useful for testing edits without changing the original. To duplicate a layer:
-
Right-click the layer.
- Select Duplicate Layer and click OK.


Deleting a Layer
If you don’t need a layer, you can remove it:

- Select the layer.
- Press the Delete key.
- Or, drag the layer to the Trash Can in the Layers panel.
Managing Layers
You can change how layers appear in your image by showing, hiding, or reordering them.
Showing and Hiding Layers
Click the eye icon next to a layer to hide or show it. Hidden layers will not appear in your image.

Reordering Layers
The order of layers affects how they appear in the image. To change the order:
-
Click and drag a layer up or down in the Layers panel.
- The layer will move to a new position.

If you need to move the Background layer, right-click it and select Layer from Background to unlock it.

Try this: In the example file, move the "Cake" layer to the top. Notice how it covers the layers below.
Editing Layers
The biggest advantage of layers is that you can edit each one separately. Here are some ways to edit layers:
Using Editing Tools
You can edit layers with tools from the Tools panel or the Filter menu. For example, the Move tool lets you reposition elements in the image.
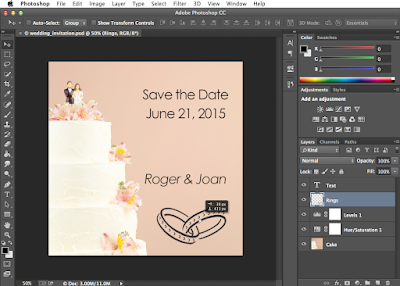
Try this: Select the "Rings" layer and use the Move tool to move it.
Selecting the Right Layer
Always select the correct layer before editing. Otherwise, you might edit the wrong part of the image.
Editing Text Layers
To edit text:

-
Double-click the text layer in the Layers panel.
- Change the font, size, or color.
Try this: In the example file, change the text from June 21 to June 15.
No comments:
Post a Comment